Teaching equivalent fractions is often a difficult task. In this article I am going to show several methods that should make this task a bit easier. I previously posted an article for using patterns blocks to teach parts of a whole. In order to provide some consistency with that article the first method I will explain here will use pattern blocks. I believe that teachers should use their own creativity in planning their lessons; however, what I am offering here are suggestions that you may want to use as hands on activities to introduce or clarify this concept.
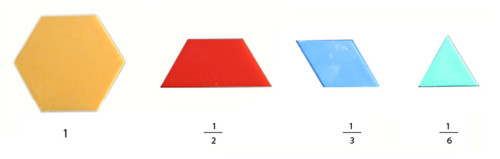
Equivalent fractions with pattern blocks
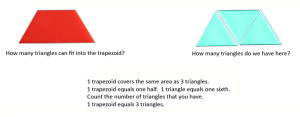
Give each group a set of pattern blocks that includes only pentagons, trapezoids, triangles, and the larger rhombi. Allow the students a few minutes to see how many of the smaller shapes can fit exactly onto the pentagon. They should record their findings as they work. Bring the class together and review their results so that everyone has the same information. 2 trapezoids fit on 1 pentagon 3 rhombi fit on 1 pentagon 6 triangles fit on 1 pentagon
Set up the following fractional representation based on the above information.
Have students work with their group to answer the following:
![]()
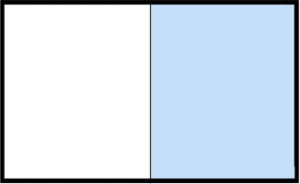
Have the students repeat this activity in their group with the rhombus and triangles. Equivalent fractions through paper folding. To complete this activity your class only needs plain white paper, a ruler and either colored pencils or crayons. I recommend using a separate sheet of paper for each step the first time you try this so that students can write the fraction that each paper represents. In my experience it is easier to fold the paper if you instruct the students to hold their paper horizontally.
Step 1 – Students will fold the paper in half. When they open the paper they will use a ruler to draw a straight line over the fold. Instruct students to color the right side of the paper. ( I always direct which side to color so that the entire class is looking at the same portion of the paper.) Have students duplicate this step for the second paper before moving on.
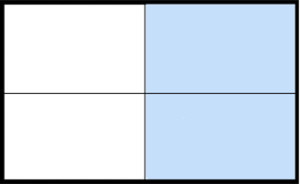
Step 2 – Students should place the duplicate of the paper from step 1 on their desk. This time they should fold the paper down and use a ruler to draw a line over the new fold. Have students duplicate this step before continuing.
Step 3 – Students will fold the right edge toward the center line and the left side toward the center. A line should be drawn with the ruler on the new folds.
Step 4 – Guide students through the process of writing the correct fraction on each paper.
Step 5 – Have students discuss what they notice about the colored area of each paper. Be sure that they realize that the areas are equivalent to each other. Guide the students through the process of writing the correct fraction for the shaded areas on each page. They will end up with a reference to use as you move on. One advantage to this method is that it is easy to transition from these representations to drawing pencil and paper representations that may help them during standardized testing.